
Beauty photography is all about the fine details, the texture of the skin, the pop of the makeup, and how light shapes the face. In this session, professional photographer Ashley Boring demonstrates how to use Westcott studio lighting to transition from soft, natural portraits to bold, experimental art. The goal of this shoot was to explore how different light modifiers can completely shift the mood of a photo. Whether you’re working in a pro photography studio or a garage, these pro tips will help you level up your beauty lighting techniques.
How to Create Natural Window Light Using a White Wall


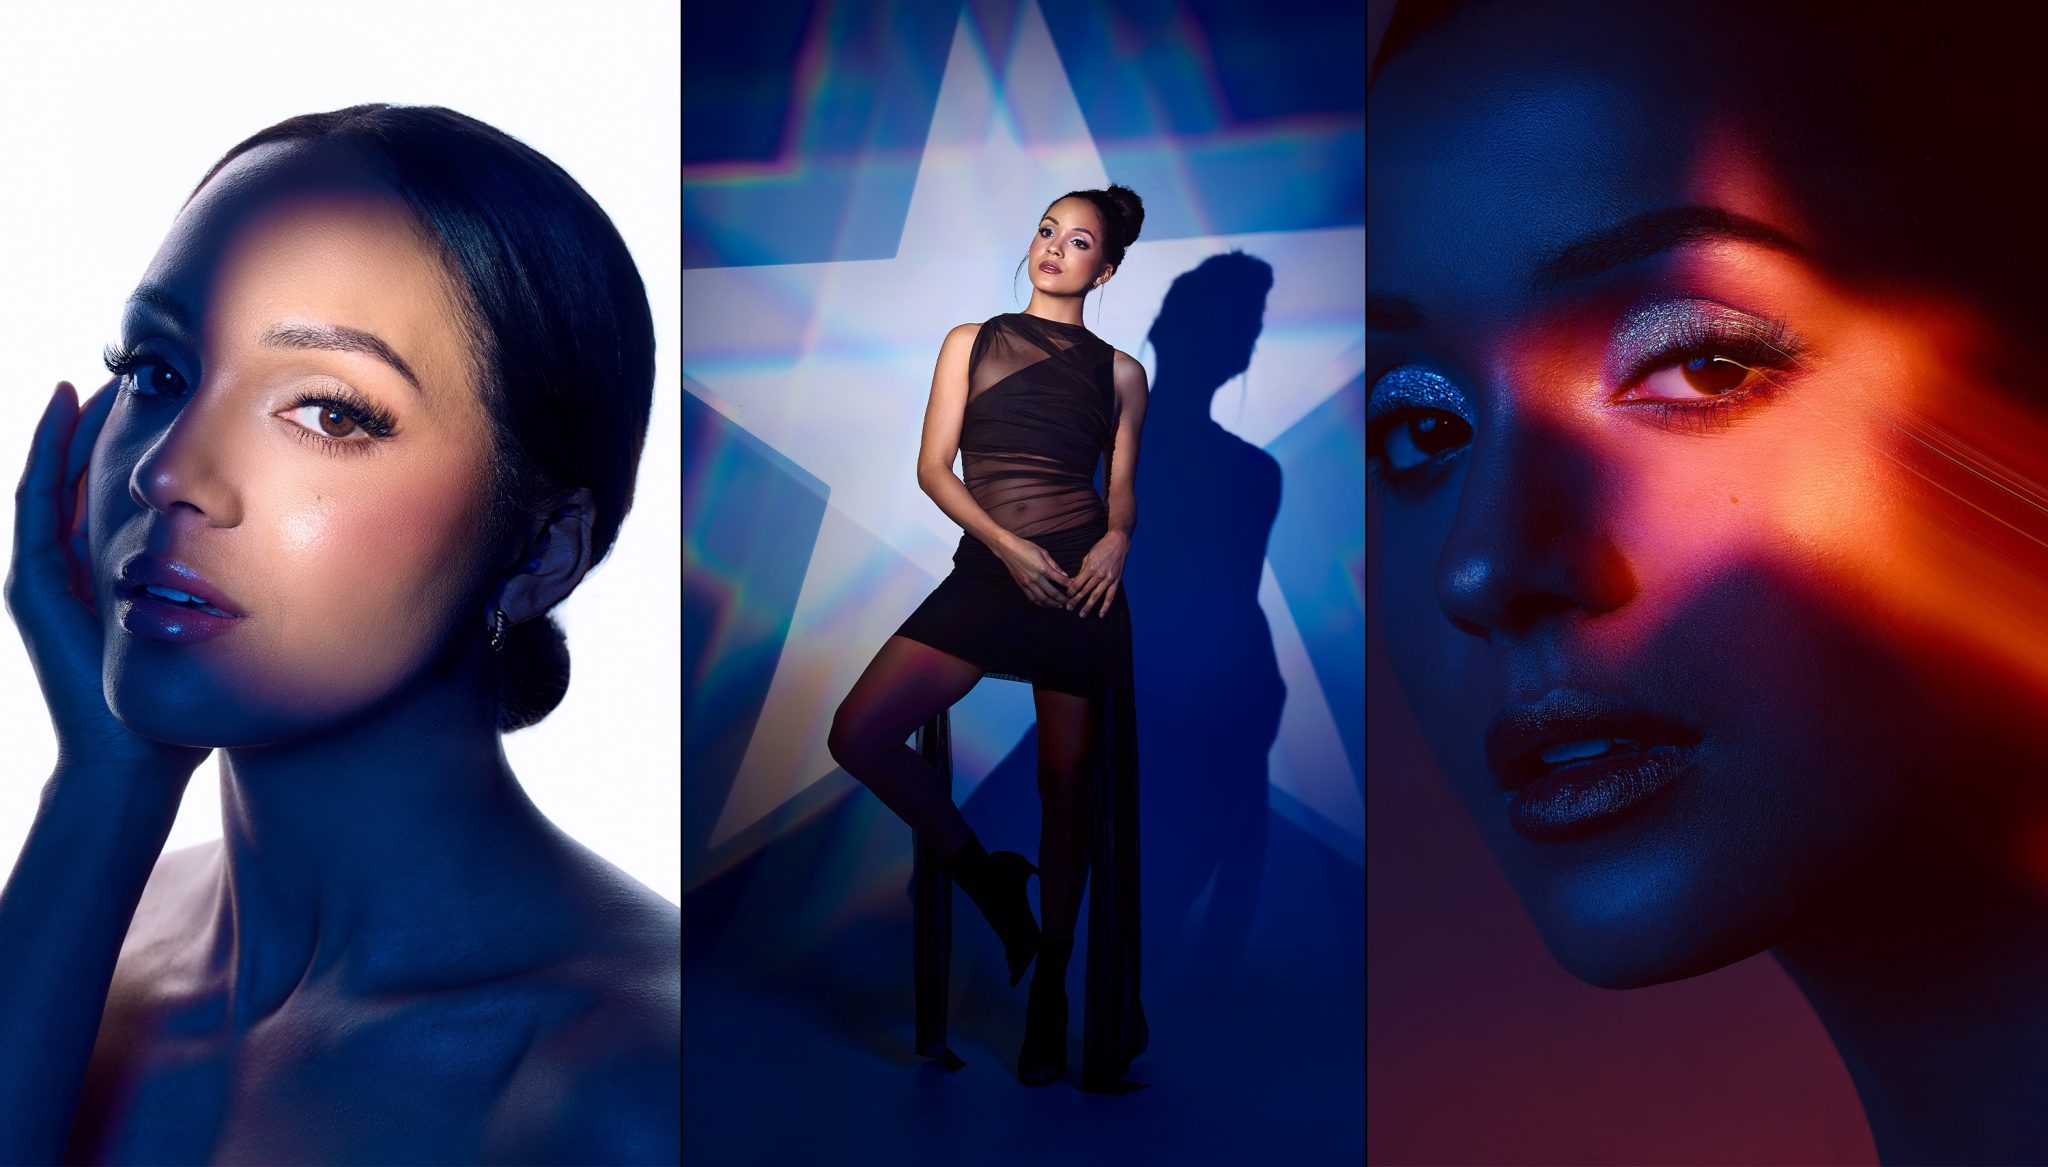
To kick off the shoot, Ashley wanted a soft, organic feel. To mimic the look of a large studio window without actually having one, she used a Westcott FJ800 Strobe and bounced it directly off a white wall. This technique turns the entire wall into a massive, soft light source that fills the shadows evenly.
Because bouncing light reduces its intensity, she set the FJ800 to power level 7. To prevent the image from looking too flat, she added an FJ400 II Strobe paired with a 24-inch Rapid Box Switch Beauty Dish. Using the silver interior without the front diffusion created specular highlights, which really make the skin texture pop. Finally, she used a Rapid Box 1x3 Strip Softbox as a rim light to create separation from the background.


Using an Optical Spot for Dramatic Lighting


For the second look, Ashley shifted to a high-contrast, dramatic style. She placed a FJ800 with Rapid Box Switch Octa-L directly behind the model to create soft wrap light, which hugs the edges of the subject’s silhouette. The closer the light is to the subject, the more it wraps around the face and shoulders.
To illuminate the model’s features, she used the Westcott Optical Spot to project a focused pool of light onto the face. To add an extra layer, she introduced a 53-inch Silver Deep Umbrella with a blue gel to fill the shadows with color.


Pro Tip: You can change the entire mood in seconds by holding up a piece of black foam core to act as a small background, instantly switching from a glowing white backdrop to a deep, moody black.


One-Light Setup for Clean, Playful Beauty Portraits


To match the periwinkle wardrobe and glittery makeup, Ashley went for a bright, and colorful look. She used an 8x8 X-Drop Pro Periwinkle Backdrop and a single 36-inch Collapsible Beauty Dish with a white interior. The white interior provides a softer, cleaner light than silver, which is perfect for a youthful, clean beauty aesthetic.
To eliminate heavy shadows under the chin, she placed an Eyelighter reflector with the white surface in front of the model. She also used a simple piece of foam core to hand-fan the model, adding wind and movement to the hair. To darken the background without changing her light settings, she simply moved the background further away, utilizing the Inverse Square Law.


Creating In-Camera Special Effects


Next, Ashley modified the background using an with the Optical Spot and a star gobo. By adjusting the focus of the lens on the Optical Spot, she projected a crisp star pattern directly behind the model. To lean into the creative side of the shoot, she added a rainbow gradient film over the lens, which transformed the white star into a multi-colored spectrum.
On the shadow side of the model, she used a 53-inch Silver Deep Umbrella with a blue gel. This created a strong color contrast between the warm skin tones and the cool blue shadows, while the rainbow star pattern provided a bold, graphic element that tied the whole shot together.


Mastering Shutter Drag and Light Trails in Beauty Photography


For the final, most experimental look, Ashley combined flash with a slow shutter speed, a technique known as shutter drag. She kept the Optical Spot but switched to an L120-B LED set to 2700K color temperature to give her more control over the motion blur.
By slowing the shutter speed to 0.5 seconds and using front curtain sync, she was able to move the camera and create light trails from the subject. To finish it off, she placed an FJ400 II with an orange gel low to the ground, creating a stunning warm-to-cool color gradient that looks like a high-end fashion editorial.


Experimentation is Key to Creative Lighting
This shoot was all about the journey from simple to complex. Photographer Ashley Boring showed that whether you are using a single beauty dish for a clean headshot or a multi-light setup with gels and optical spots, there is no single right way to shoot beauty portraits. The best results often come from starting with a solid foundation and then pushing the boundaries of what your gear can do. By walking through these five distinct looks, we saw how small changes like swapping a silver beauty dish for a white one or dragging the shutter can completely redefine the mood of an image.
The most important takeaway is not to be afraid of experimenting during a session. Some of the most interesting effects, like the rainbow star or the light trails, come from simply trying a new light modifier or a different shutter speed to see what happens. When you stop worrying about the rigid rules of lighting and start focusing on the feeling of the image, your unique style will begin to shine through. The goal of any beauty session should be to play with light until you find a look that matches your subject’s personality and your own creative vision.
Looking for more creative inspiration in your portrait photography?
Check out How to Create a Mirrored Lighting Effect In-Camera, where photographer Ashley Boring shows you how to achieve stunning looks without any post-processing.
Westcott Gear in Action:


Easy Boom with 28" Extension Arm9942

Easy Boom with 28" Extension Arm9942


You must be logged in to post a comment.