
Learn how legendary photographer Jerry Ghionis creates powerful, emotive portraits using lighting, posing, and purposeful direction. This in-depth portrait lighting tutorial takes you behind the scenes of his photography workflow, covering the tools, techniques, and practical tips you can apply to your next shoot.
Over the course of 60 minutes, you’ll see how Jerry sculpts light with the Ice Light 3, draws out emotion through subtle direction, and builds dynamic compositions that work for individuals, couples, and editorial-style shoots. Whether you’re working in a studio or on location, this extended portrait lighting tutorial session is packed with insights to help you improve your portraits with more purpose and polish, without over-complicating your setup.
Start with the Right Tools: Lighting and Gear That Shape the Shot
For Jerry, every great photograph begins with light. “Lighting is number one,” he says. “If the light is beautiful, the location doesn’t even matter.” Throughout the video, Jerry uses a mix of lights from Westcott’s continuous lighting system. The Ice Light 3, especially with barn doors, is his go-to for shaping light into narrow beams or soft, even floods. The RGB version of the Ice Light adds creative color, perfect for background effects or mood. The L60-B and L120-B provide more power when needed, especially with softboxes and beauty dishes. Jerry controls everything using the Westcott app, which lets him adjust power and color without stepping away from the camera. The whole system is easy to use and keeps everything consistent.
Jerry’s 5 Steps to a Great Photograph
Every strong image starts with a clear foundation. Jerry approaches each portrait with a thoughtful structure in mind, five core elements that work together to create a photo that’s not only well-lit and technically sound, but also full of emotion and purpose. Whether you’re shooting in a studio or on location, these five steps can help guide your creative decisions from start to finish.
- Lighting – Always the top priority.
- Background – Clean or textured, depending on the story.
- Posing – Must be intentional and flattering.
- Camera Technique – Lens choice, depth of field, and composition.
- Emotion – Directed through subtle cues like brow tension, breathing, and gaze.
Posing Tips That Make Every Shot Count
To Jerry, posing is never just about making someone look good; it’s about telling a story, shaping the frame, and helping the light do its job. He calls it “purposeful posing,” and it’s one of the most important tools in creating portraits that feel intentional and emotionally connected. Every movement, tilt, or hand placement should either flatter the subject, enhance the light, or support the overall mood of the image. Whether he’s working with an experienced model or someone brand new in front of the camera, Jerry keeps his direction clear, simple, and efficient.
One of his go-to techniques is the “Lazy Susan” method, where the subject rotates in place without changing their overall pose, like turning a platter on a table. This allows Jerry to adjust the angle without disrupting body language or expression.
He also uses mirror posing as a fast and effective way to get natural results. Rather than over-explaining, he simply models the pose with his own body and asks the subject to copy it.
Jerry also tailors his posing to how light is falling. For female subjects, he often turns the body away from the light and the face back in, creating soft, flattering shadows down the center of the dress or neckline. For male subjects, he usually faces the body toward the light for a more defined, confident look.
Finally, he pays close attention to negative space, making sure there’s room between arms and bodies, and avoiding awkward overlaps between faces or hands. Especially when posing as couples, he thinks of them as puzzle pieces, carefully fitting them together to keep the connection strong and the composition clean.
Bold and Clean Male Portrait
Jerry starts with a dramatic portrait of Wyatt using three lights. The main light is an Ice Light 3 with barn doors, set to a narrow beam for a clean sliver of light across the face. A second Ice Light adds a subtle edge light on the opposite side to separate Wyatt from the background. A third light adds just a touch of light to the backdrop. The whole setup is clean, simple, and super effective. It shows how much impact you can get by building your lighting one step at a time.


One of the biggest lessons Jerry shares in this moment is about the power of perspective. Once you’ve built a great lighting setup, don’t lock yourself into one angle. Jerry often pauses, asks the subject to stay still, and physically moves around the set to find new compositions. He explains that as photographers, we tend to get stuck in a single viewpoint, but simply walking to the left or right, even just a few feet, can reveal better angles, cleaner lighting, or a stronger connection to the subject. With just a shift in position, you can get an entirely different image from the exact same setup.


Couple Portrait with Intentional Lighting
In the second setup, Jerry photographs Wyatt and Ferly together. He keeps things moody and cinematic by split-lighting Wyatt from one side and using softer, warmer light on Ferly. Their poses are close but carefully placed, so faces and features don’t overlap in awkward ways. Jerry pays close attention to how their hands fall and how their faces align, building a pose that feels connected but still has shape. The result is a strong couple portrait with just enough edge and contrast to feel dramatic.


Sculpting Light and Curves in a Classic Female Portrait
Now it’s Ferly’s turn in front of the camera for a soft, elegant solo portrait. Jerry uses a single Ice Light 3 mounted overhead on a boom arm, with the barn doors slightly closed to control the spill and shape the light. This setup creates beautiful, sculpted highlights across her face and body. He shoots wide open at f/1.2, allowing the background, made from two X-Drop Pro 8x8 Parchment Paper backdrops, to fall into a smooth, creamy blur. The light is set to around 4500K, adding a warm glow that complements Ferly’s golden hair and detailed gown.


Jerry fine-tunes her pose to create soft curves, carefully adjusting small details like shoulder angles and hand placement. To add even more interest, he later introduces color into the background light, giving the image extra depth and mood while still keeping the overall look clean and timeless.


Fire and Ice: Using Color to Add Drama and Dimension
This next look is all about contrast, both in pose and color. Jerry lights Ferly with warm light from the Ice Light 3 bi-color while Wyatt is lit with cool blue light from the RGB version. Their bodies are posed with distance and depth. Ferly stays in focus, with Wyatt softly fading in the background. The result feels like a movie poster with a strong mood and great color contrast.

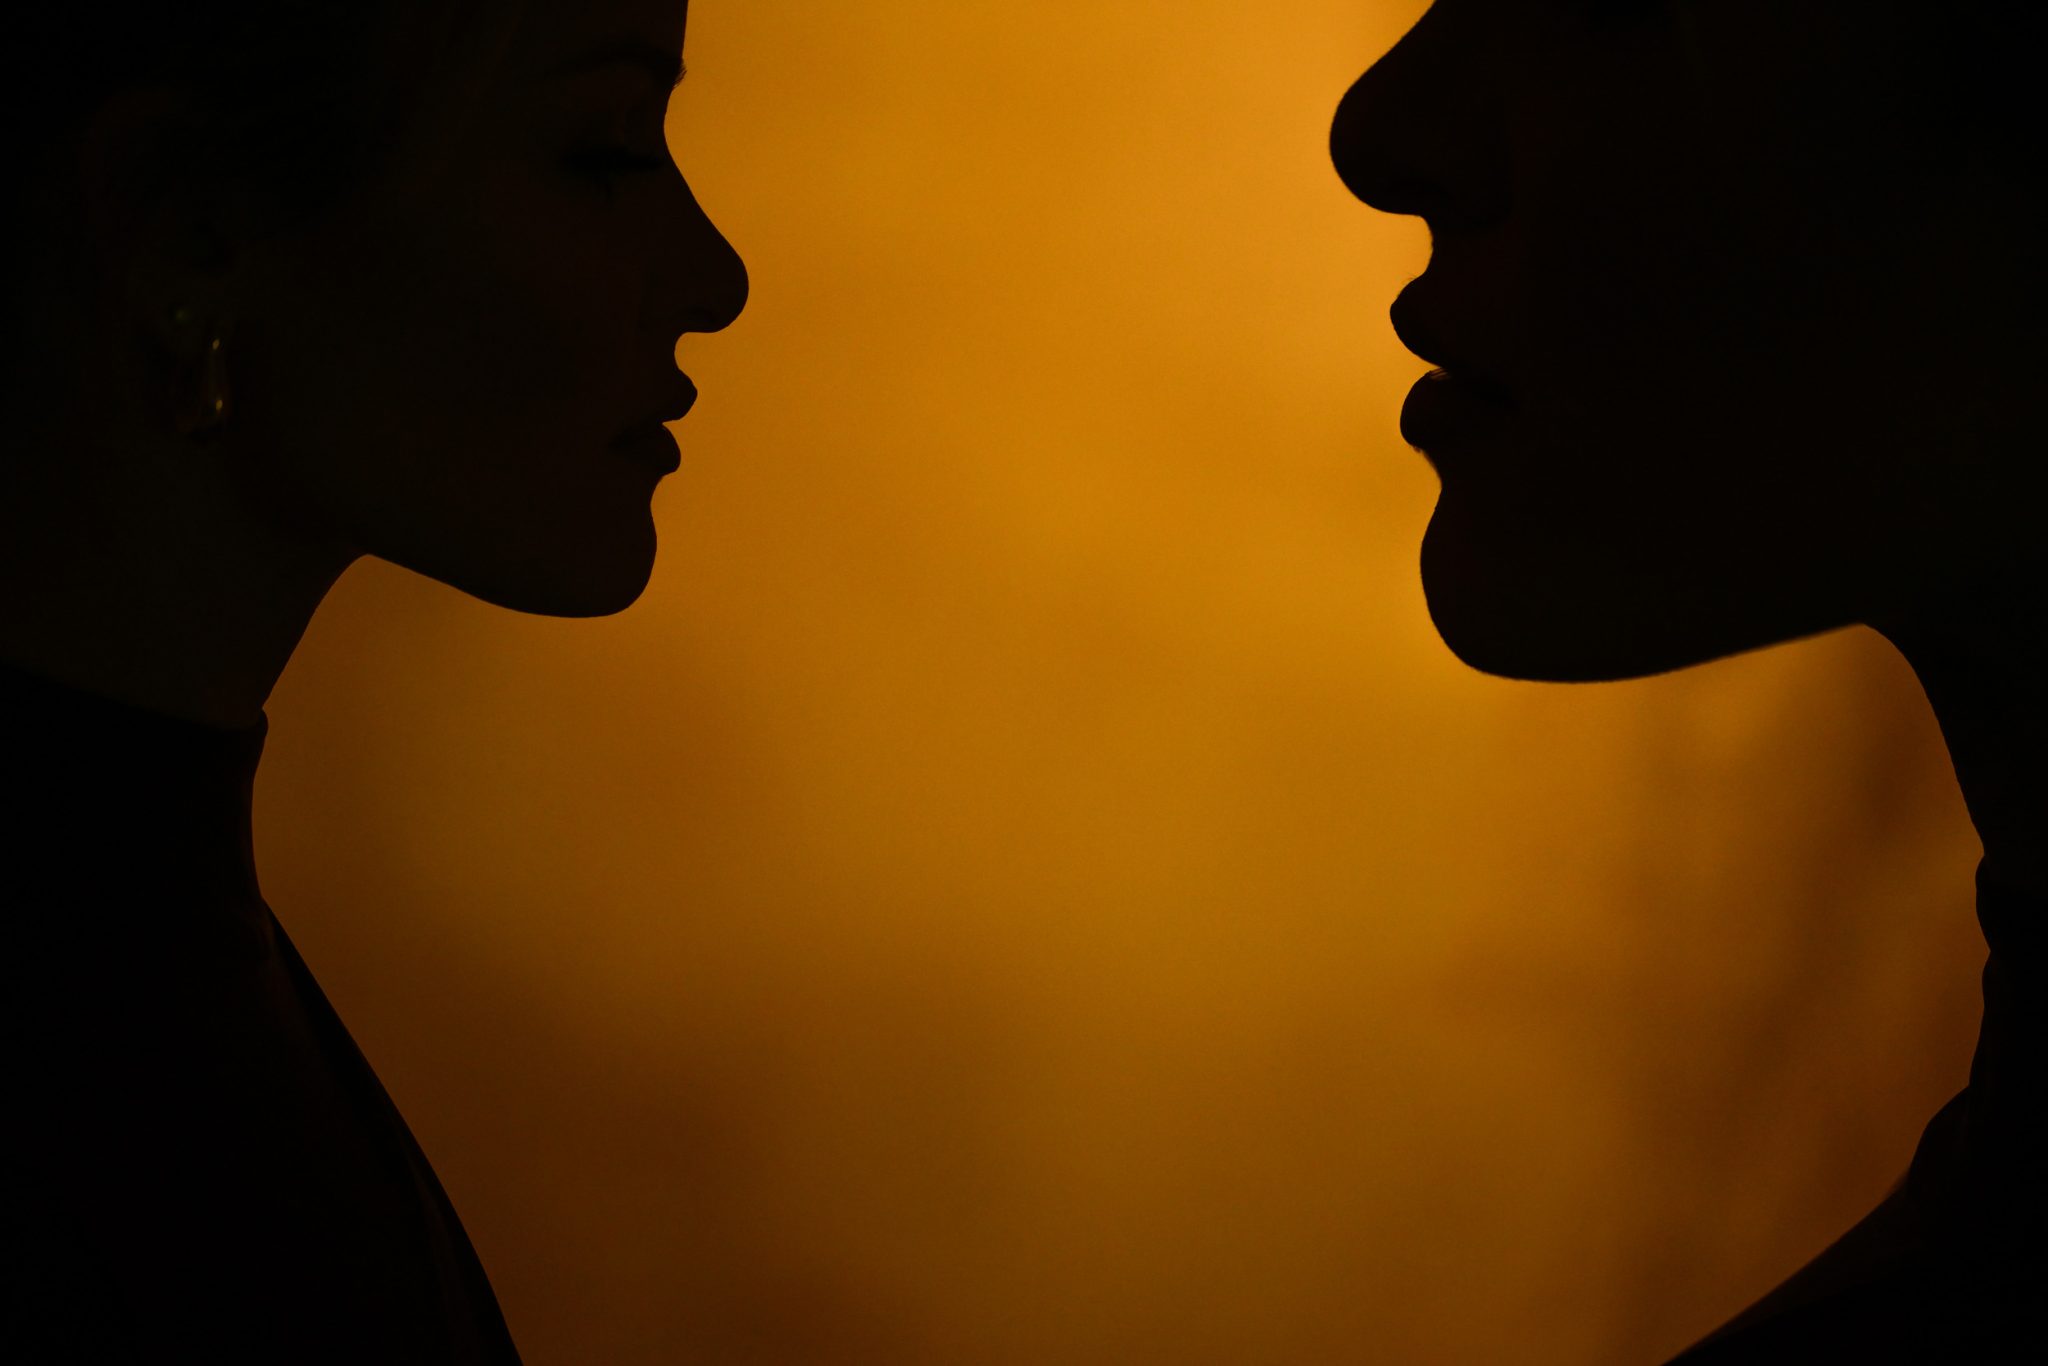
Double the Impact with a Creative Silhouette Exposure
Jerry gets creative with multiple exposures, using the Nikon Z8 to capture two shots in one frame. He places the Ice Light 3 RGB behind Ferly, set to a warm yellow, and shoots her profile from one side, then moves her and shoots again from the other. Because the light is behind her, he gets a clean silhouette both times. He pays close attention to the shape of her profile and makes sure nothing overlaps. The final image is graphic, clean, and super eye-catching, perfect for something like a fine art or editorial portfolio.
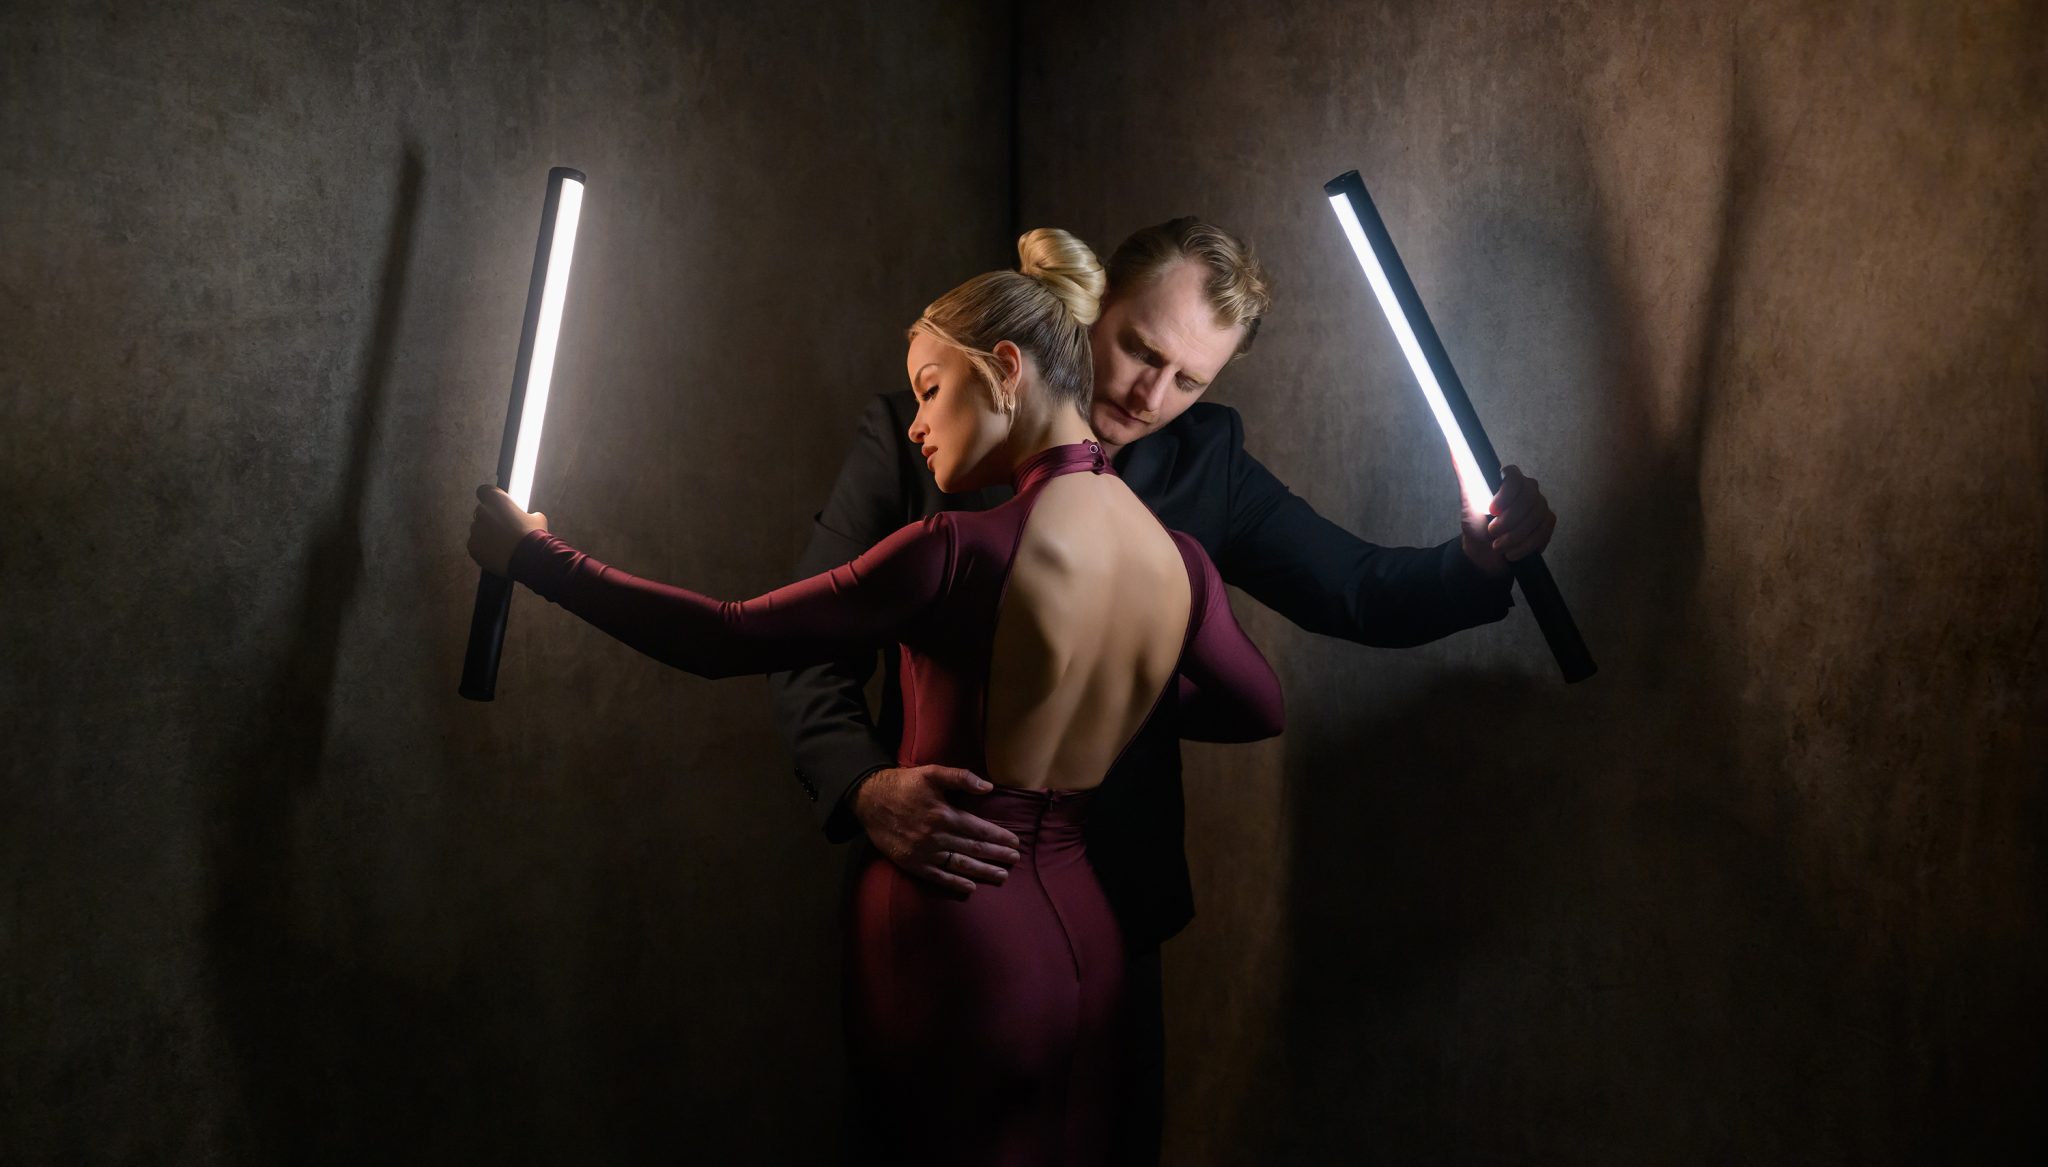
Using Ice Lights as Practical Lights
One of the unique things Jerry highlights in this tutorial is that your lights don’t always have to stay behind the scenes. Sometimes, they can be part of the shot itself. With their sleek design and soft, clean output, the Ice Light 3s can double as practical lights, visible elements in the frame that enhance the overall look and feel of the image.
In a few setups, Jerry intentionally places Ice Lights within the shot, using them not just to light the subject, but also to shape the subject or add structure to the composition, so even when the light is in view, it doesn’t distract enhancing it.
This approach works especially well in more stylized or editorial looks, where light can serve as a design element. By treating his tools as part of the visual story, Jerry adds color and texture to the image while keeping his setup efficient. It’s a great reminder that your gear doesn’t always have to be hidden; it can play an active role in the scene when used with intention.


Wrapping Light and Building Depth with the L120-B
In the final look, Jerry brings in the L120-B LED paired with a beauty dish and egg crate to create a soft, powerful key light that wraps beautifully around the subject and helps sculpt the body. To add separation and depth, he also introduces an Ice Light 3 as an edge light, placing it just off camera to highlight the subject’s outline. This combination shows how different lights from Westcott’s system can work together seamlessly.
Jerry explains that having lights like the Ice Light 3, L60-B, and L120-B in the same ecosystem makes it easy to build a setup that fits your needs, whether you’re working handheld, on a boom, or lighting a full set. If you need something compact and portable, the Ice Light is perfect. If you need more power and coverage, the L120 will deliver. Since they all match in color temperature and are controlled from a single app, you can stay focused on the creative decisions without getting slowed down by technical ones.


Build with Intention, Light with Purpose
This lighting tutorial is packed with lessons that go beyond just lighting and posing. One of the biggest takeaways is the value of building your shots with intention. Jerry shows that with just a few lights and small changes in position or expression, you can create images that feel polished, emotional, and full of depth.
Another important point discussed in this lighting tutorial is how helpful constant lighting can be, especially when you’re sculpting with shadows or layering colors. What you see is what you get. You can move a light just slightly and instantly see how it affects the subject or the background. That kind of control is hard to match with flash. It lets you work faster, direct your subject more clearly, and experiment freely without guessing.
Finally, this tutorial session is a great reminder that you don’t need a huge setup to get powerful results. Whether you’re using one Ice Light or building a full three-light scene, it’s all about how you shape the light and guide your subject. Start with a strong foundation, make small adjustments as you go, and let the story build naturally.
Want to see more of Jerry Ghionis’ work?
Check out his Creating Cinematic Night Portraits | Lighting Guide, where he shares simple yet powerful tips for using constant light outdoors at night.


You must be logged in to post a comment.