
When it comes to creating dynamic portraits of athletes, you don’t need a fancy studio, just smart lighting and a good game plan. In this behind-the-scenes video, photographer Jaison Sterling walks us through how he transformed a high school gym into a dramatic portrait set for a wrestler using a few portable strobes, clever modifiers, and some strategic light placement.
Jaison has shot countless sports portraits over the years, and this setup has become one of his go-tos. Whether you’re working with a high school athlete or a professional fighter, the techniques in this shoot are designed to deliver high-impact images with just a small kit of gear, and a lot of intention.
Lighting Setup: Gear, Placement, and Why It Works
Main Light: FJ400 II Strobe and Beauty Dish
Jaison’s key light was a Westcott FJ400 II strobe powered by the Pro Max battery, which gave him extra shots without having to swap power mid-shoot. This was crucial, especially since he was using high power to cut through the ambient gym lighting. He paired it with the 36” Manny Ortiz Beauty Dish Switch (silver interior). This gives him that crisp, specular light that really brought out the texture and muscle definition in the wrestler’s skin. No grid, no diffusion, just hard, clean, directional light. It’s perfect for capturing bold athletic portraits with punch and presence.
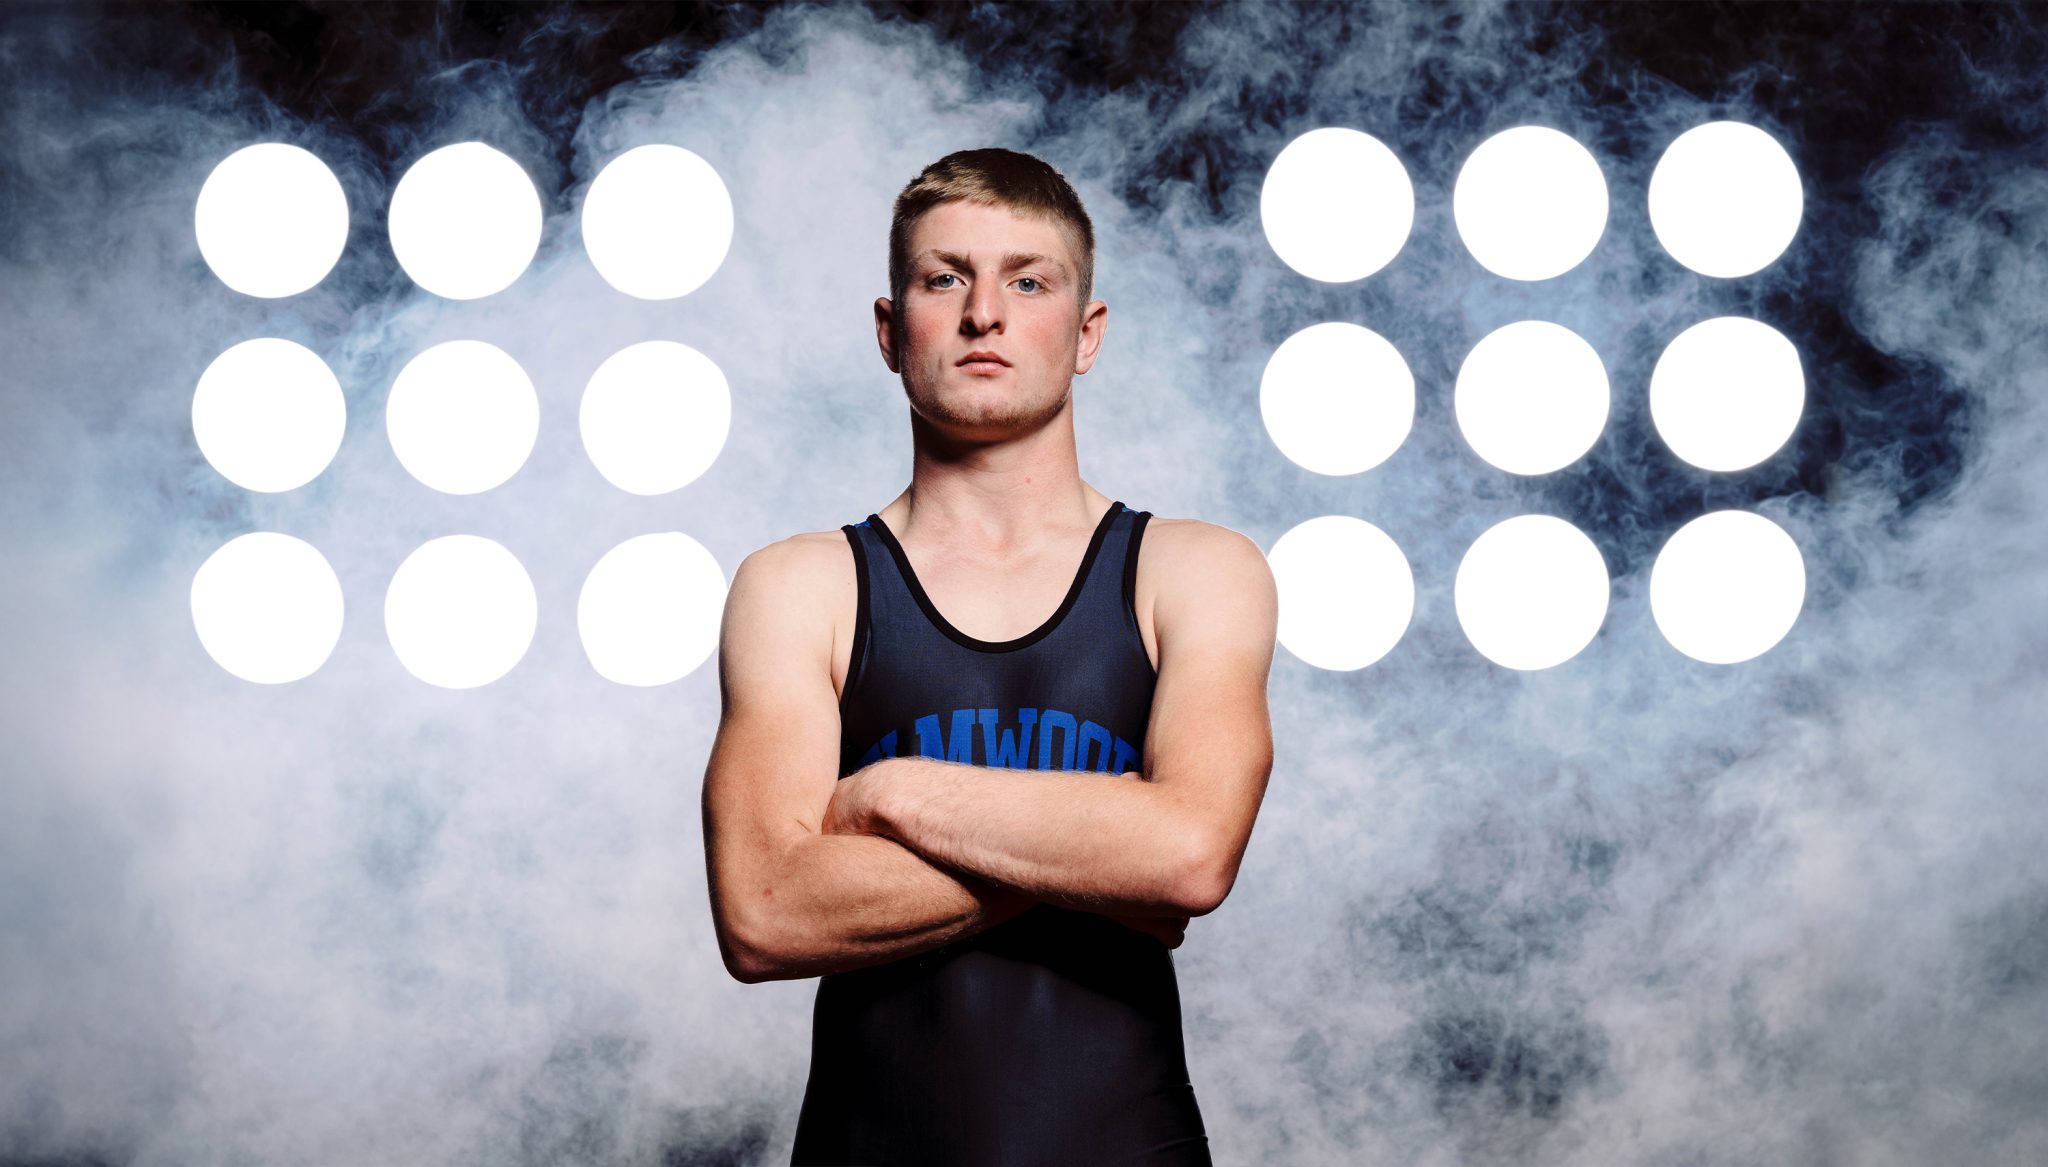
Rim & Background Lights: FJ400 II and 3×3 Rapid Boxes with Pro Light Mods
To help separate the subject from the gym environment, Jaison added two additional FJ400 II strobes as rim lights. He modified them with Rapid Box Switch 3×3 softboxes and Pro Light Mods, which not only created a nice edge light around the wrestler, but also added some visual interest and structure to the background.
Placing these lights about 12 feet behind the athlete gave enough room for fog to roll through the scene without covering the subject. And because of the Pro Light Mods’ built-in patterning, they created that moody “stadium light” effect in-camera, no Photoshop needed.


Tip: Use Longer Focal Lengths to Maximize Impact
One of the big takeaways from this shoot is Jaison’s lens choice. By shooting with a longer focal length (in this case, around 110–120mm), he was able to:
- Compress the background, making the Pro Light Mods appear larger and more dramatic
- Use less fog, since the zoomed-in perspective required less visual coverage
- Isolate the subject, making the wrestler pop off the background even more
It’s a simple trick that makes a big difference when working in busy or tight locations like a gym.


Three Looks with One Light
What makes this shoot so versatile is how quickly Jaison was able to shift the mood just by repositioning his key light. By mounting the light to Westcott’s Easy Boom and placing it on a C-stand with wheels, he was able to move the light around quickly and easily. This setup gave him the flexibility to create completely different looks without having to stop and rebuild his lighting from scratch.
Look 1: Classic Power Pose
The key light is centered and slightly raised, aimed directly at the athlete. This gives a clean, bold look with strong definition, perfect for wide shots and traditional poses.


Look 2: Side-Light Drama
By moving the key light to the side (in the direction the wrestler was looking), Jaison introduced deeper shadows and stronger contrast. This added more mood and shaped the subject’s face for a cinematic feel.


Look 3: Overhead Boom and Reflector
For the final look, Jaison went for maximum drama by booming the key light overhead. This top-down angle cast strong, moody shadows that emphasized the wrestler’s form and added an edge to the portrait. To help control those shadows and bring back just enough light into the face, he placed a Quick Grip Reflector in front of the athlete and experimented with both the white and silver sides.
- The silver reflector kicked in a stronger fill, bouncing more light back into the subject’s face and bringing out extra detail. While this worked well for visibility, it also softened some of the shadows, reducing the overall mood.
- The white reflector, on the other hand, offered a more subtle fill. It lifted the shadows just enough to reveal facial features without overpowering the dramatic lighting setup. This side helped maintain the gritty, intense lighting.
Jaison prefers the white side of the reflector for this setup, as it provided just enough fill to bring out key facial details without taking away from the overall drama of the shot. If you’re aiming for an even darker, more intense look, you can skip the reflector entirely. This gives the image a raw, unfiltered edge, but keep in mind that you may need to lift some of those deep shadows in post to recover important details.


Final Thoughts: Small Changes, Big Results
What’s so smart about this lighting strategy is how fast and flexible it is. With just three lights and a few simple adjustments, Jaison was able to create three completely different and powerful looks, all without turning off the gym’s overhead lights. The setup is efficient, portable, and adaptable, making it perfect for working in real-world locations where you might not have full control over the environment.
Whether you’re shooting for a high school team, a personal portfolio, or even a commercial campaign, these techniques can help you transform almost any space into a dynamic portrait set. It’s a great reminder that with the right lighting and a little creativity, you don’t need a fancy studio to create studio-quality results.
Want to see more of Jaison Sterling’s work?
Check out How to Create Light Trails for Dynamic Portraits, where he shows how to freeze motion and capture dramatic light trails using a mix of strobes and continuous lighting.


You must be logged in to post a comment.