

Photo by: Scott Valentine
You know those images of wine glasses that have glowing edges against a solid black background? The technique (called “dark field” photography) is a popular studio approach for showing off the smooth curves of translucent or transparent objects.
It is less commonly applied to opaque objects, though it does sometimes show up in unusual commercial shots.
I first used dark field imaging in microscopy, examining the surface of metals for technical characterization. In this tiny world, dark field imaging lets you see surface textures that can otherwise be hidden using standard bright field, or direct lighting. Photographers can use the same idea to bring out texture or enhance detail. When combined with more traditional lighting, you can get some startling effects.
The idea of dark field imaging is simply to use a large light behind the subject, but then block out a small portion of the light with a “dark field patch” between the subject and the light. The camera is then positioned such that the field of view is slightly smaller than the patch, so the background of the image is flat black and no light goes directly from the source to the lens.
Light from your source will spill over the edges of your patch and “graze” the surface of your subject. By controlling the amount of spill, you can control how much light wraps around your subject. You can do this by changing the size of your light source, or more simply by repositioning the patch, thus changing the relationship between the sizes of the light and the patch. Check out the illustration if you’ve not tried this setup before.
Dark Field Lighting Setup
 Dark Field Lighting vs. Traditional Lighting
 Dark Field Lighting vs. Traditional Lighting
This grazing light (blue in the illustration) is what you can use to your advantage for bringing out textures, especially in otherwise flat (not necessarily smooth) surfaces. To get this specific effect, the area you photograph must be relatively flat in the field of view. Imagine a basketball: it’s round all over, but if you zoom in with a macro lens the surface can look flat compared to the raised textures from the little bumps. Check out the two images of a metal surface.

Image A

Image B
The ‘A’ image is shot with a combination of dark field and soft front fill lighting. The ‘B’ image is shot only with dark field lighting. You can see details on the surface that are invisible in the more traditional lighting shot. These details are surface defects that are the same color as the surrounding metal, but have a slightly different height (tiny scratches and dings). You can also see the different highlight positions in the two shots. Nothing changed between the frames except turning off the front fill. In post processing, I reduced the saturation so the effect is more readily visible, but only minor sharpening and exposure control was used.
Dark Field Variables
As you can see in the illustration, there are a lot of variables to play with. The distance between the source and patch can affect the hard edges as well as the angle of light on the subject. Moving the subject back and forth, the angle of incidence changes slightly, giving you a variety of effects. For the metal image, I also had to rotate the surface so light would just barely skim across the top. Note the highlights are essentially blown out – these surfaces face the side-firing light more directly.

Photo by: Scott Valentine
Now check out the vacuum tube. It was shot in nearly the same setup as the metal box, but I had to adjust the aperture flags a bit to prevent spill into the lens, which would cause flare. This shot was a little more difficult to set up because I wanted the dark field light to show off the edges of the glass, while the coil and other elements were lit by a warm fill. This picture demonstrates another challenge with shooting glass: stray reflections. Since this particular glass is laying down, I had to be careful to cover up any reflective or light surfaces from above that I didn’t want to show up. The side baffles in the illustration are used for this purpose, as well as a top ‘cap’ on the table-top stage.
Additionally, I dropped a strip of orange construction paper along camera right, just below the glass – there is a warm highlight along that lower edge of the subject. This provides some depth cues for the viewer. Post processing again was done simply by exposure control and a small amount of sharpening. You can see that I didn’t get the glass quite clean enough – this is a hazard of dark field imaging!

Photo by: Scott Valentine
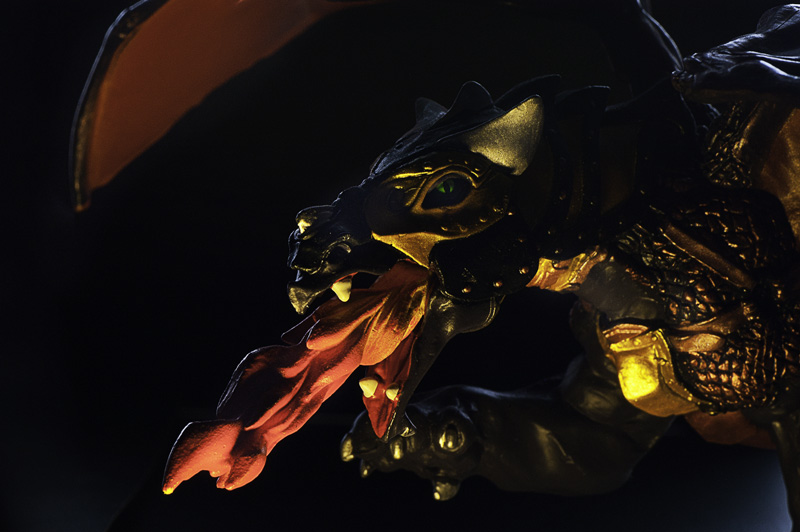
This small toy dragon was given drama with the same lighting treatment. In this case, the trailing edges are cool and highlighted, while the front is glowing warmly. I moved the model further from the dark patch to reduce the edge lighting, which meant I had to make use of the aperture flags to control spill again. In the setup illustration, the offending stray light is shown along the green line, so the flag on camera left was brought inside the field of view, then cropped out. I also had to move the camera back a little and zoom in.

Photo by: Scott Valentine
Finally, this headset shows a combination of opaque and translucent surfaces. The metal frame has beautiful, hard highlights, while the plastic ear and mouth pieces almost glow, pulling the light further around than the contrasting opaque edges. This combination of opaque and translucent edges really shows off what you can do with dark field lighting, showing just enough detail that you can recognize the subject without giving it all away.
Explore Dark Field Lighting
Dark field photography lighting is a great way to build drama and moodiness, even in mundane subjects. But it can also give a lot of information about small details textures and edges. Combining these characteristics yields some fantastic creative results. The keys to vastly different looks lies in experimenting with the relationships of off-camera elements in your setup, as well as combining with other lighting techniques. Rotate your subject, look for unique angles. The headset and metal images are suspended from black cord and wire, for example. Pay careful attention to highlights, and add or take away gobo pieces to shape your surface reflections. But most of all, get in there and tinker!
This post was written by Scott Valentine. Learn more at his website.
[…] field tutorial by Wescott: Dark Field ImagingWestcott University Steve the Photographic Academy.com SharpShooter Industries My 500px, My Flickr, My Blog […]