
Starting out with photography lighting can feel a bit like learning a brand-new language, and it is completely normal to feel a little intimidated. In this guide, photographer Jake Collins walks you through four essential portrait lighting patterns using Westcott gear to help you master the basics. By the time we’re finished, you will have the confidence to step into any studio setting and create beautiful, professional portraits.
Short Lighting vs. Broad Lighting
The first decision you need to make for any portrait is where to position your subject’s face. Short lighting happens when the subject turns their nose toward the light, putting the side of the face closest to the camera in shadow. It is incredibly flattering and is the go-to choice for most modern portraits. Broad lighting is the opposite, where the nose turns away from the light, illuminating the side of the face facing the camera. While it was popular in old paintings, it works best on very symmetrical faces, so Jake usually recommends sticking with short lighting for a slimming, modern look.


Quality of Light: Hard vs. Soft
The quality of your light is all about how your shadows look. Jake starts with a Westcott FJ400 II strobe and Rapid Box Switch Octa-S softbox placed close to the subject to create soft, gentle shadows that hide skin imperfections. This soft light is usually the best choice for studio work. If you switch that softbox for a hard reflector, you get high-contrast, hard light that looks like the bright sun. Remember the golden rule: the bigger the light source and the closer it is to your subject, the softer and more flattering your light will be.


Butterfly Lighting
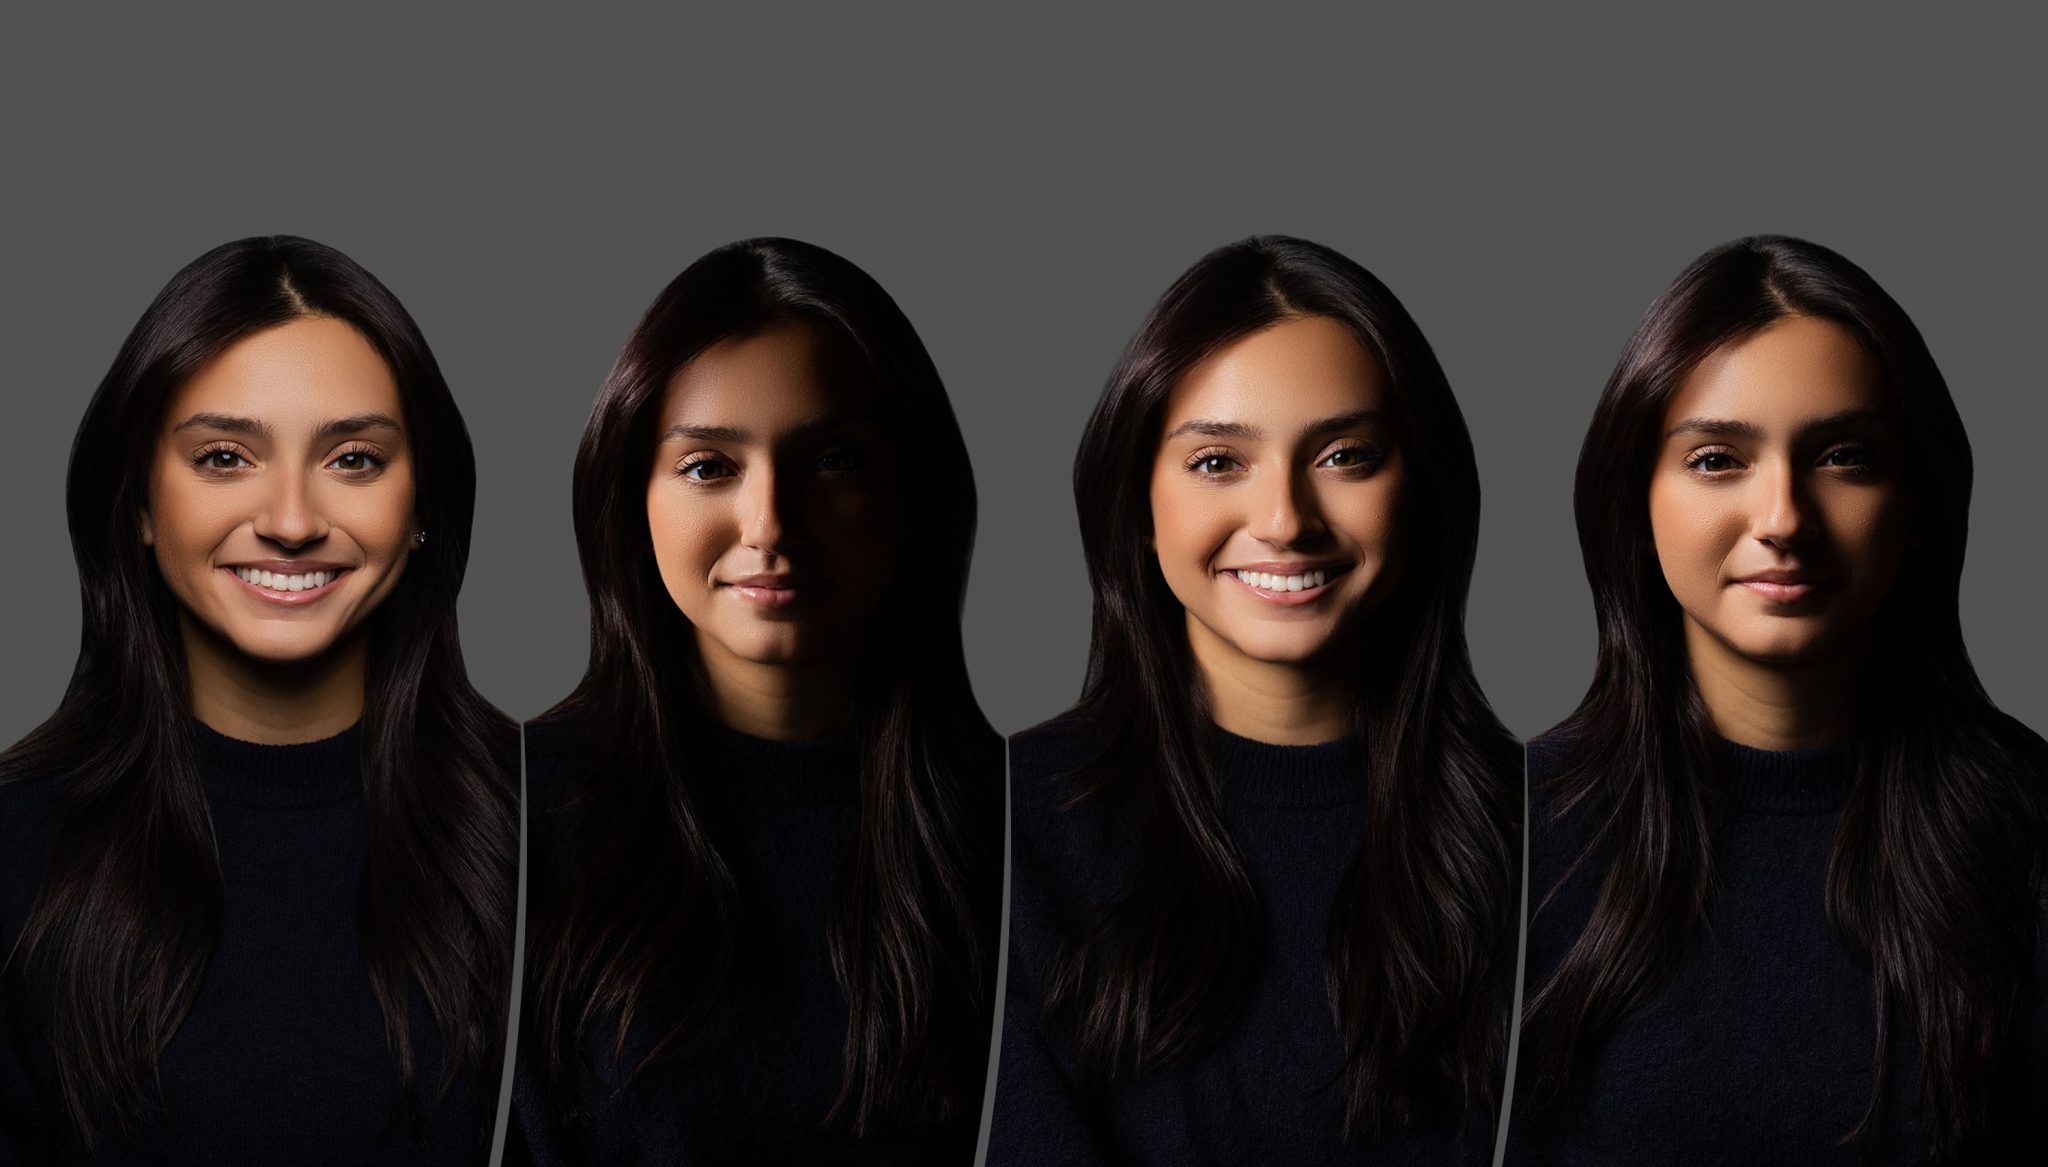
One of the easiest patterns to learn is butterfly lighting, which is also sometimes called Paramount lighting because of its history in old Hollywood. It looks great on almost everyone and is very simple to set up. You just place your light directly in front of your subject and raise it slightly above their head. Jake uses a 8-inch Shorty Offset Arm on his light stand so he can stand right underneath the light with his camera without bumping into the gear.
When you have the light in the right spot, you will see a small, butterfly-shaped shadow appear directly under the subject’s nose. The key is to make sure the shadow stays about halfway between the nose and the top lip. If you move the light too high, the shadow will stretch too far down and cover the mouth, so keep a close eye on your height as you adjust the stand.


Split Lighting
If you want to create a portrait with a lot of drama and mood, split lighting is the perfect choice. This pattern does exactly what the name suggests: it splits the face perfectly in half, with one side brightly lit and the other side falling into deep shadow. This look is famous in sports photography and moody movie posters because of the intense, powerful feeling it gives the image.
To get this look, move your light stand directly to one side of your subject. You want the light to hit them from a 90-degree angle so that it illuminates only one half of the face. Jake makes sure to flatten the angle of the light and check for a catch light in the subject’s eye to keep them looking alive. The goal is to make sure no light leaks over to the dark side of the face, keeping that split nice and clean.


Loop Lighting
Loop lighting is arguably the most popular lighting technique used by photographers today. It is a fantastic middle-ground option that adds dimension to the face without being as intense as split lighting. It is very easy to achieve and works well for all types of subjects, making it a must-know skill for any photographer.
To set this up, move your light to a 45-degree angle from your subject. You are looking for a small shadow to loop off the edge of the nose onto the cheek. While setting this up, Jake always checks the subject’s eyes to ensure the catch lights are at the 10 and 2 positions. This keeps the eyes bright and engaging while the soft shadow on the cheek adds a beautiful sense of depth to the portrait.


Rembrandt Lighting
Named after the famous Dutch painter, Rembrandt lighting is the most classic and professional-looking pattern of the bunch. It is a bit harder to get exactly right, but it is well worth the effort. The hallmark of this style is a small, perfect triangle of light that appears on the shadowed cheek. The rest of that side of the face should remain in shadow, creating a very artistic and moody vibe.
To find the Rembrandt triangle, move your light further around the side of the subject than you did for the loop pattern and raise it a bit higher. You have to be careful, though, because if the subject turns their head even slightly too far toward the light, the triangle will open up and turn back into loop lighting. It takes a bit of fine-tuning to dial in the perfect triangle, but once you see it, the results are stunning.


Recap and Main Takeaways
Mastering these four patterns takes time and plenty of practice, but you don’t need expensive gear to start learning. Jake suggests practicing at home by turning off all the lights in a room and moving a single light source around a friend or family member. You can achieve these looks with a Westcott strobe, speedlight, or constant light.
The best way to get comfortable is to just keep shooting. Start by noticing where the nose shadows fall and how the catch lights look in the eyes. Once you can see the light, you will be able to dial in these patterns quickly and easily. Keep practicing, don’t be afraid to make mistakes, and have fun with it!
Want to Learn More about Flash Photography?
Check out Mastering Flash Photography: 5 Lighting Principles for Beginners, where Mark Behrens and Steve Batz of Panoptic Photography help you master the basic principles of lighting with flash photography.


You must be logged in to post a comment.