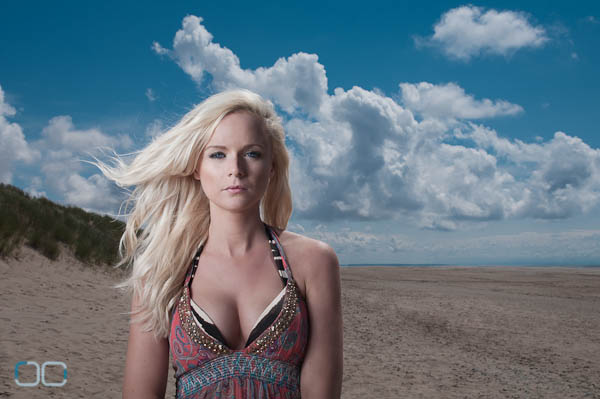
F11, 1/500th, ISO 200
Levels Aimed At:
Simple lighting setup with a little practice. One light source (Key light), setup. Controlling background exposure to render your creative results.
Anything I should know?
Radio triggers that allow for AutoFP/High Speed Sync are needed. IR setups tend not to work At least 2 or 3 strobes.
In Brief
In this article we go in search for the sun, which is pretty difficult to do in the UK it seems.
So what was I going to do today? Well with the wet weather, I thought to have play around with various toys and try to push them to their limits a little. Heres how the session played out.
On arrival to our location it didn’t look promising as the dark clouds decided it was time for a spot of rain (no change there really), but I was determined to utilise the model that I had booked for a previous event.
FULL ARTICLE
Welcome to another FREE! Lighting article. In this article we go in search for the sun, which is pretty difficult to do in the UK it seems.
So what was I going to do today? Well with the wet weather, I thought to have play around with various toys and try to push them to their limits a little. Heres how the session played out.
On arrival to our location it didn’t look promising as the dark clouds decided it was time for a spot of rain (no change there really), but I was determined to utilise the model that I had booked for a previous event, which, I had to cancel as it did not look promising.
To my delight half an hour into the time the sun came out – yay! So it was time to push the Nikon speedlights to their max with the idea of controlling the sun/background. Now! Knowing that one speedlight at distance wasn’t going to be powerful enough today. When the sun is that bright with no cloud cover you just know it needs more power ( I have a scene from Star Trek running through my head about now). I was also using the Westcott Apollo Orb light shaping tool (Which I have to say I LOVE!), and while this works in studio and grey days, a small strobe in sunlight will be lost.
Luckily for me, my good friend came over to test his new Sigma 70-200 F2.8 APO HSM lens (Won’t shut up about how good it is. Brian! I know I have the same one remember?). Brian happened to have a tri-bracket to allow 3 speedlights to be mounted to the bracket. Mounting this bracket into the Westcott Orb was simple and quick.
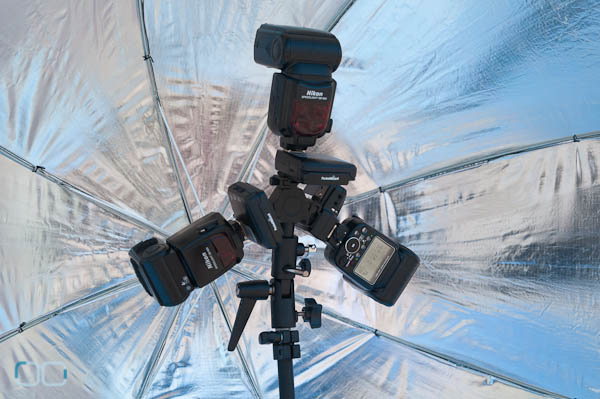
3 Nikon Speedlites inside the Westcott Apollo Orb
The one thing to remember when it comes to balancing the background and foreground (subject) is that your shutter speed will be quite high to bring the brightness down. This means that we have to be creative when using settings and equipment. Both Nikon and Canon (I also think the Olympus flash system), have the ability to shoot past their flash sync speeds (1/200th for example). However, both of these systems do have issues.
Using the PocketWizard Flex and Mini, means I don’t have those issues and as long as I am in Hypersync mode on the triggers I can meter for the light using the Sekonic RT-32 CTL.
You will here and see me bang on about the PocketWizard Control TL system along with the Sekonic CTL system and Westcott light shapers as they all work hand in glove with each other and for me suit my workflow perfectly.
OK! Lets get to shootin’
First up is a quick ‘Diagram shot’ of the set up.
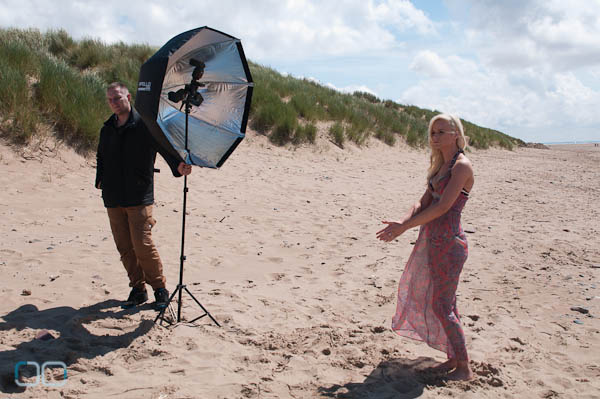
Westcott Apollo Orb 6′ away from subject
The sun is positioned right behind the subject and the Main light or Key light to the left of camera position. You will notice that the Orb does not have the fabric on the front. The fabric will take up to a stop of light away. I also have an assistant holding the gear in place. The wind is coming straight towards the lighting rig.
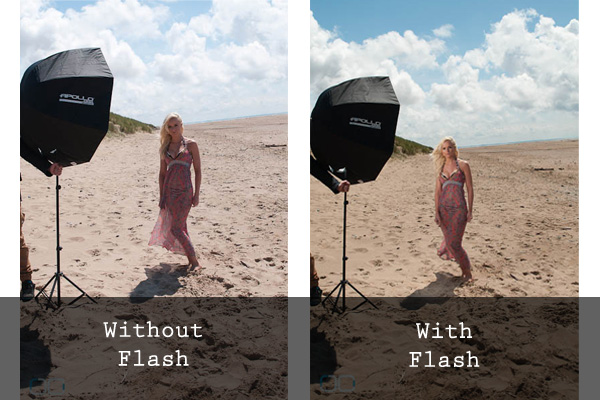
Before & After shot to show with/without Speedlite
The first image above shows how dark the subject face is due to the metering of the ambient. It is also visible how adding flash makes a world of difference! Each image was taken at F4 with a shutter speed of 1/3200th @ ISO 200. This shows just how bright that pesky sun can be.
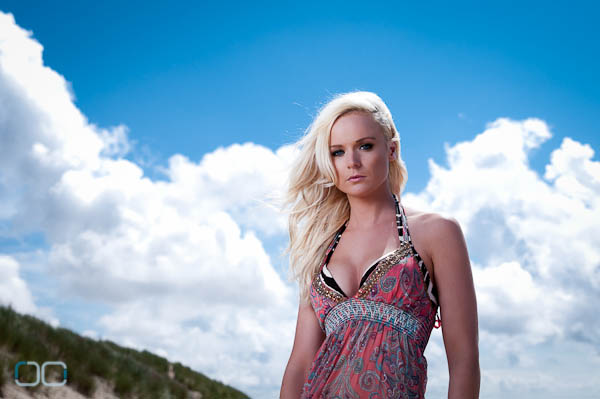
F4, 1/3200th Shutter, ISO 200
Using an aperture of F4 doesn’t put the flashes under any test, so I decided to go the opposite way, and use a high F-stop and lower shutter to see how the flashes would cope.
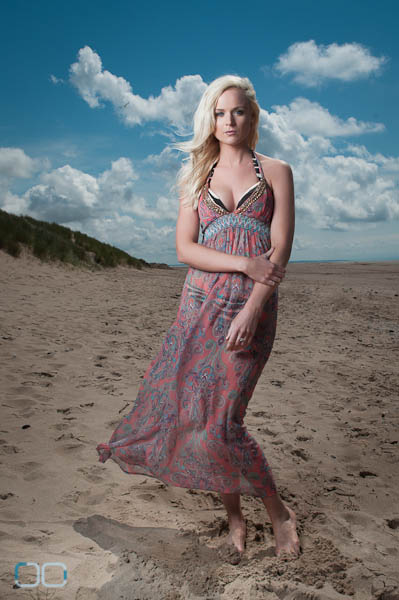
F-13, 1/500th ISO 200
Using the Orb and speedlight setup as shown above this is the quality of light that can be achieved when using off camera flash techniques. Notice the nice fall off of light the Orb gives 1/500th of a second shutter puts me back on range of Hypersync, which means I can now start using the L358 to fine tune the exposures of both Background (ambient), and foreground (Subject).

F11, 1/500th, ISO 200
The shot below is created using the same balancing act of the two exposures (fore and back), and the same lighting setup only the location/angle has changed.
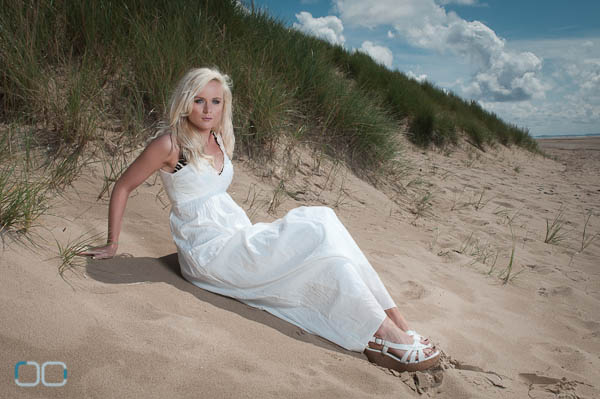
F13, 1/500th, ISO 200
It just goes to show what is achievable with a few strobes really, and I have been asked the question of Why didn’t I just use a larger studio head with a battery pack? Firstly there is no right/wrong answer here only personal preference ? and heres mine.
Studio heads and battery packs are heavy to carry and it is surprising just what I can get in to my rucksack! At present I have 4 speedlights, PocketWizard set, 2 bodies and lenses, so easy to carry everything with me seeing as I also take my bag.
The other preference is when using lights I like to have control and for me I can add or take away speedlights when needed so the system is a configurable solution.
This article was written by Jayce Clarke and originally posted on his blog 07/15/2012. To find out more from Jayce, you can visit his website: Jayce Clarke Photoschool
Gear Used:
- Nikon D300
- Sigma Lenses
- Apollo Orb Speedlight Octabox Kit (43")
- PocketWizard
- Sekonic L358 with RT32-CTL module
- BlackRapid RS-7 Strap

You must be logged in to post a comment.