
When you want to capture bold, dramatic portraits, gels unlock a world of creative possibilities. Few tools are as effective or as fun for transforming the mood of an image. In this session, Westcott Top Pro Ashley Boring breaks down lighting setups with gels in an approachable way, showing just how much impact they can bring to your portraits.
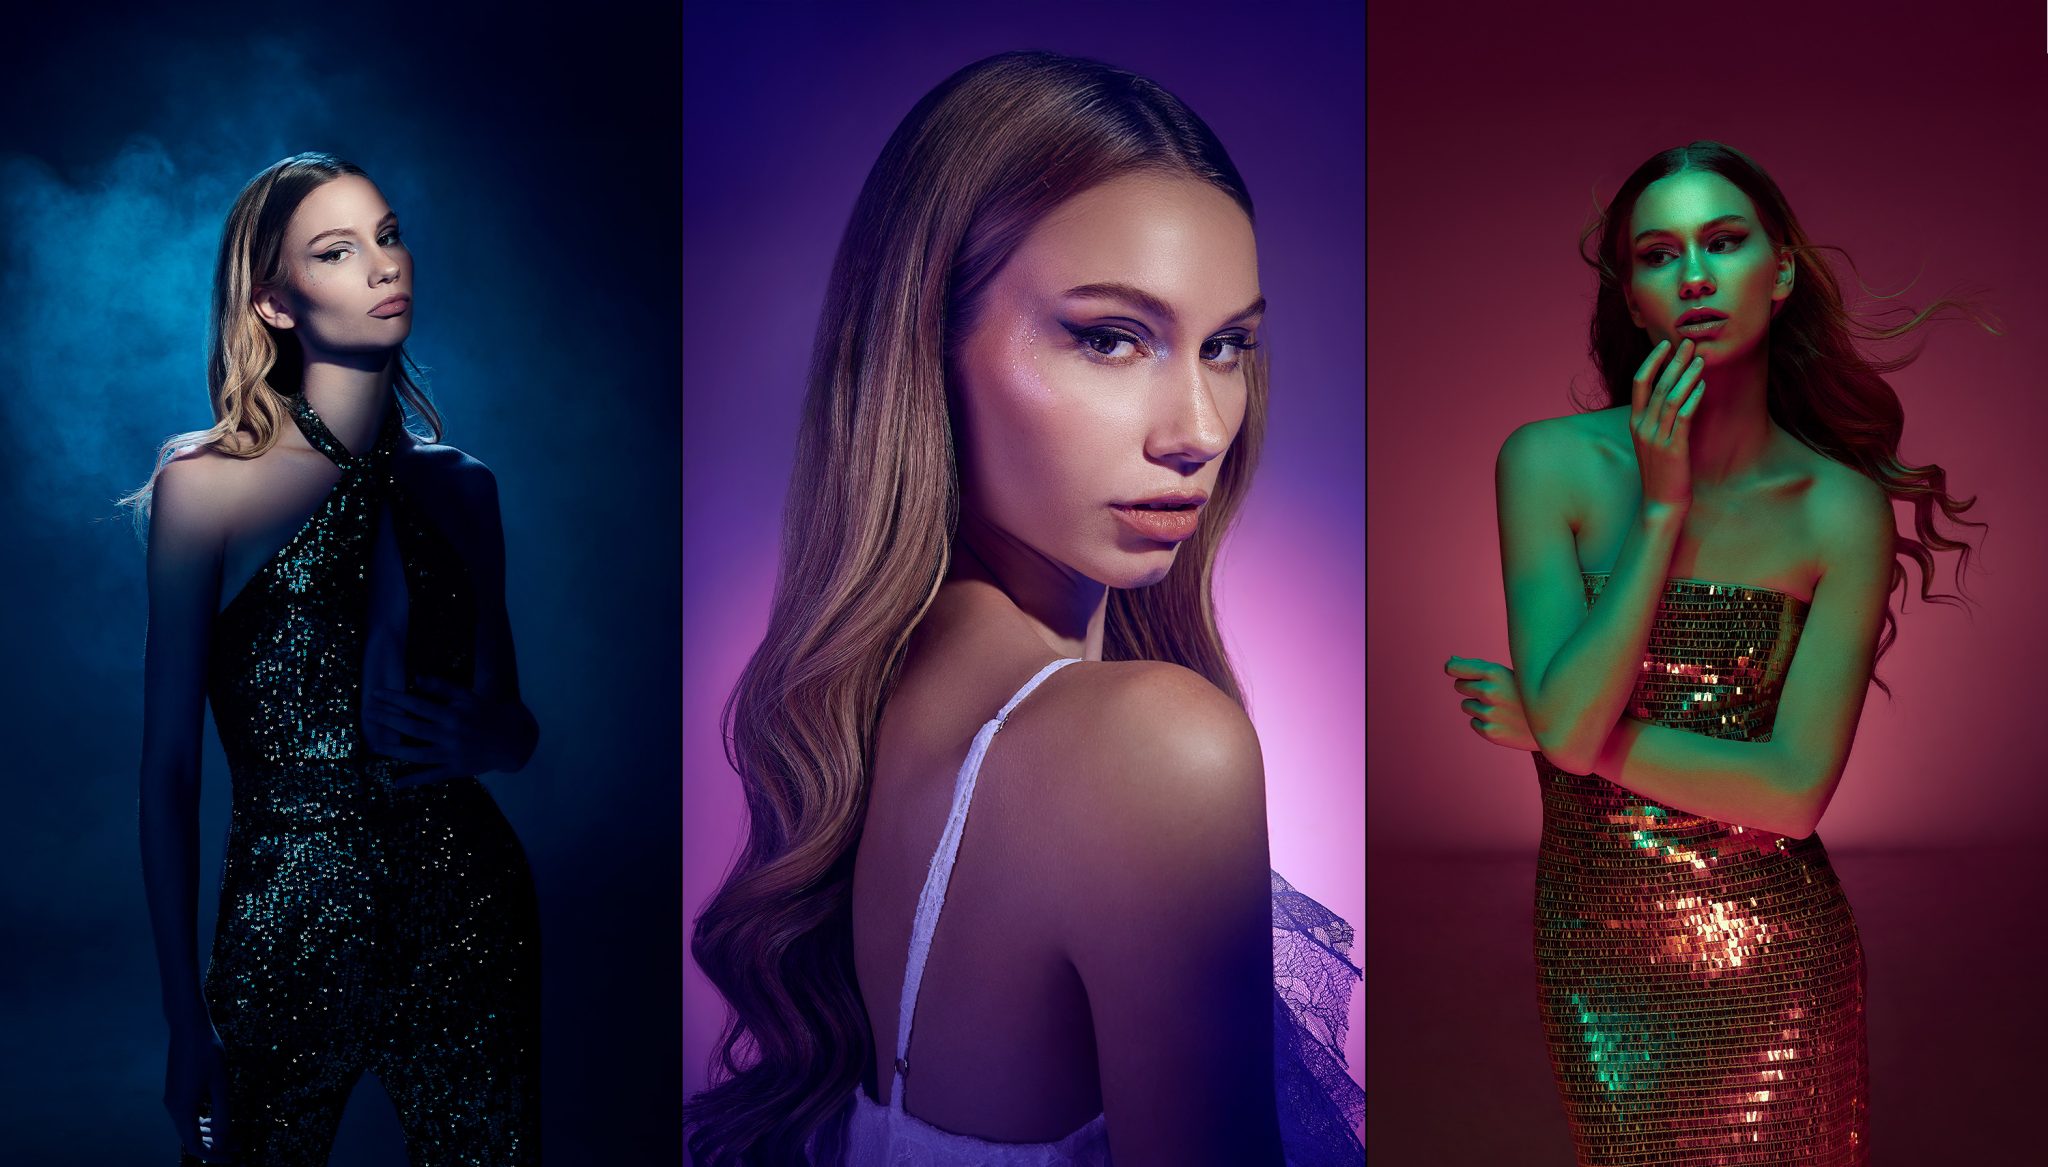
So why work with gels at all? Adding color to your lights lets you move beyond traditional neutral tones and start shaping the mood of your photo in a completely new way. If you’ve ever wanted your portraits to pop with color, this breakdown will give you the foundation. Ashley walks through three unique setups, monochromatic, soft and blended, and bold complementary color, and shows exactly how she used Westcott lighting and FlexiGels to bring each look to life.
What Are Lighting Gels and How Do They Work?
At their core, gels are simple: they’re colored filters that go in front of your light to tint it. But while they may look straightforward, there are a few key things to understand to get the best results. First, the density of the gel affects how much light passes through. Darker or more vibrant gels absorb more light, meaning you’ll lose some output compared to shooting with bare strobes. That’s not a bad thing, but it does mean you need to adjust your power levels with intention.
Gels don’t always behave the same. Pushing your power too high can cause a gel to lose its rich color, making it look closer to white than the vibrant tone you were aiming for. That’s why Ashley always recommends testing your gels before a session to see how they render in-camera at different power levels.


For this shoot, Ashley used Westcott Vivid FlexiGels with the FJ Wireless System strobes. Unlike traditional gel sheets that you tape or clip onto modifiers, FlexiGels are made of silicone and slide right onto the flash dome. This makes it much easier to use gels inside larger modifiers like umbrellas and softboxes, while also giving an even, consistent color spread. It’s a simple upgrade that can save time and frustration in the studio.


Creating a Monochromatic Mood with Gels
The first setup Ashley created was a blue monochromatic look. This approach is great when you want your portraits to feel stylized and cohesive without being overly complicated. By filling most of the frame with one color tone, you can completely shift the mood of the image. Blue often reads as cool, moody, or dramatic.


The setup used an FJ400 strobe paired with an Optical Spot as the main light. Unlike the other lights, this one was left un-gelled. By keeping the spotlight clean and white, Ashley ensured that the subject’s skin tones stayed natural and accurate. The Optical Spot also gave her a very tight beam of light, almost like a theater spotlight, which drew the viewer’s eye directly to the model’s face.
To create the overall blue tone, Ashley used a 53” Deep Umbrella with a Vivid Blue FlexiGel as fill. This casts a wide wash of blue across the scene, filling in shadows and surrounding the subject in color. For added separation, she added a hair light from behind, also gelled blue, which outlined the model’s head and shoulders. A grid on the reflector helped narrow the beam so it didn’t spill into unwanted areas, and atmosphere spray revealed the light beam in the air for added drama.
Finally, a Rapid Box Switch 1x3 gelled blue was aimed at the background. This kept the backdrop from going completely black and tied the entire image together under the same color palette. The key to making this work was balancing the intensities: the clean white optical spot was much brighter than the gelled lights, so even though blue was everywhere else, the subject’s face stayed clean. Ashley made sure the model stayed locked in position, since even small movements would have shifted her into the blue fill and completely changed the look.


Building Dreamy Portraits with Soft Gels
The second setup went in a very different direction: soft, blended color using an analogous palette. Instead of sticking to one dominant hue, Ashley combined blue, purple, and pink, colors that sit next to each other on the color wheel. This is a trick many photographers use when they want their images to feel dreamy, harmonious, and balanced. Unlike complementary colors that fight for attention, analogous colors flow together naturally.


Ashley started with the Optical Spot as her main light, but this time she defocused it and positioned it off to the side of the subject. Defocusing softened the light edges, creating a gentle transition between the white key light and the surrounding colored fill. Moving it to the side also gave her contouring shadows across the face while keeping harsh background shadows out of the frame, since the subject was closer to the wall.
For fill light, Ashley used the 53-inch Deep Umbrella with a Vivid Purple FlexiGel. The broad spread of the umbrella allowed purple to wrap around the subject and spill onto the wall behind her, pulling double duty as both a fill and a background light. She added another light with a Vivid Pink gel placed low, giving the wall a soft pink and purple gradient. This subtle transition gave the background more depth and dimension.
To add a final touch, Ashley used a Rapid Box Switch 1x3 with a Vivid Blue colored gel bounced off the floor. This created a very gentle lift of cool tones from below, blending beautifully with the purple and pink tones. It’s an understated detail, but it helped unify all the colors into one cohesive image. The result was a soft, dreamy look that felt colorful without being overpowering.


Going Bold with Complementary Color Gels
For the last setup, Ashley turned the energy way up with bold complementary colors. Complementary colors sit opposite on the color wheel and naturally create high contrast and visual tension. In this case, she chose teal and pink, a punchy combination that immediately grabs attention and gives the portrait a vibrant, edgy vibe.


The main light was an FJ400 paired with a Beauty Dish and gelled with teal. By placing it high above the subject and angling it downward, Ashley was able to keep flattering light on the face while still creating deep shadows below the chin. These shadows gave the pink fill light more space to shine through, making the color separation stronger.
For fill, Ashley bounced a 1×3 Rapid Box with a Vivid Pink gel off the floor. Bouncing the light softened it and kept the brightest pink tones low in the frame, directly opposite the teal light coming from above. Layering teal on top and pink on the bottom, created a dynamic separation across the subject’s face and body.
To tie everything together, Ashley added another 1×3 strip softbox gelled pink to the background. The splash of pink behind the subject made the teal highlights stand out even more and helped frame the model within the scene. As a finishing detail, she introduced a snoot with teal gel aimed at the reflective dress. Because the dress caught and reflected light, this small pop of teal at the bottom added balance to the color scheme and kept the entire frame cohesive.


After getting her safe shot, Ashley experimented with light trails. By switching to a two-second shutter speed and using the modeling lamps on the pink and teal lights, she captured streaks of color bouncing off the sequins of the dress. She added small camera movements and subtle model movements to enhance the effect. This added energy and motion, bringing the portraits to life.


Final Thoughts: Unlocking Creativity with Colored Gels
From moody and monochromatic, to soft, blended pastels and bold complementary colors, gels can give you an incredible range of creativity. With just a few lights and some FlexiGels, Ashley built three completely different looks in the same studio space. The setups prove that you don’t need dozens of lights or complicated edits to get bold, artistic results, you just need a little planning and the confidence to experiment.
The real power of gels is that there’s no right or wrong way to use them. They can be subtle, adding just a hint of tone to shadows, or they can take over an entire scene with striking color. They can even create motion effects and reflections that go far beyond standard portrait lighting. The more you practice, the more you’ll learn how color interacts with light, and the more creative control you’ll gain over your images.
So next time you set up your strobes, try a gel or two and see how it transforms your shot. Whether you’re going for dramatic, dreamy, or bold, gels are one of the simplest and most rewarding ways to make your portraits stand out.
Looking for more creative inspiration in your portrait photography?
See Ashley’s lighting breakdown in Easy Tips to Create 3 Unique Looks in 1 Photo Shoot.
Westcott Gear in Action


Easy Boom with 28" Extension Arm9942

Easy Boom with 28" Extension Arm9942


You must be logged in to post a comment.